airnativeextensions
  •  Extensions
    • All Extensions
    • Packages
    • Frameworks
    • Adobe AIR
    • Unity
    • Categories
    • Device Hardware
    • Free
    • Media
    • Native Services
    • Native UI Components
    • Open Source
    • SDKs
  • News
  • Showcase
  • Support
    • Documentation
    • Developer docs
    • Tutorials
    • FAQs
    • Contact
    • Contact Us
  • Login

Getting Started with Native Extensions

Tutorial

Getting Started with Native Extensions

This tutorial will cover adding a Native Extension for Adobe AIR to your application.


We are going to be focusing on the native extensions developed by distriqt, but this guide should apply to any native extension (ANE).

Native Extensions for Adobe AIR are code libraries that contain native code wrapped with an ActionScript API. Native extensions provide easy access to device-specific libraries and features that are not available in the built-in ActionScript classes.

Their usage is similar to a SWC package of precompiled Flash symbols.

In the following tutorial we’re going to go through the process of adding an ANE to your AIR application using some of the most common AIR development tools. We assume you already understand the process of developing and deploying mobile applications using AIR so will just be concentrating on the additional steps required to get an ANE working.

Contents

  1. Add the Extension
    • Flash Builder 4.6 / 4.7
    • Flash Builder 4.5
    • Flash Professional CS6
    • Flash Professional CS5.5
  2. Advanced Details
  3. iOS SDK
    • Flash Builder 4.6 / 4.7
    • Flash Professional CS6
    • Flash Professional CS5.5 / Flash Builder 4.5
    • Windows
  4. Start Coding
  5. Further Information

Add the Extension

An AIR Native Extension (ANE) is a single file with the extension "ane". This file contains all of the native and actionscript libraries that are implemented by this extension. You don’t need access to a separate SWC file or to the source code to be able to use the ANE.

Here we will add the extension to your build process so that your application can use the functionality provided by the extension.

Flash Builder 4.6 / 4.7

In your mobile project you want to add it into, open up the project properties by right clicking on your project and selecting Properties. Find the "Actionscript Build Path" (or "Flex Build Path" if it's a Flex project).

You'll see a tab up the top labeled Native Extensions in which you can Add ANE....

Click on this and select the ANE extension file. Once it's added in, you can expand out the details of the extension to see the target platforms supported by the extension. Below I'm showing the details on our Android Camera Extension.


The extension is now included in your project, however before you leave the project settings, go to the "Build Packaging" for the platforms you are deploying and check the extension is going to be packaged (and available) with them.


You should now be able to return to your code and use the functionality and classes supplied in the extension, hopefully you've been supplied with documentation or example usage of the extension!

Flash Builder 4.5

The older version of Flash Builder is a lot more complex to get running and unless you’re forced to I’d highly recommend updating to 4.6/4.7. It involves a few scripts and tricks to get it running which we'll show on OSX here, but you should be easily able to adapt it to other operating systems.

There are many methods but this is what we’ve found to be the simplest.

Firstly rename the ANE file to have the extension SWC.

com.distriqt.Camera.ane    >     com.distriqt.Camera.swc

Then we include the SWC like we do any normal SWC, open:

Project / Project Properties / Flex/Actionscript Build Path 

In the Library Path tab, click Add SWC...


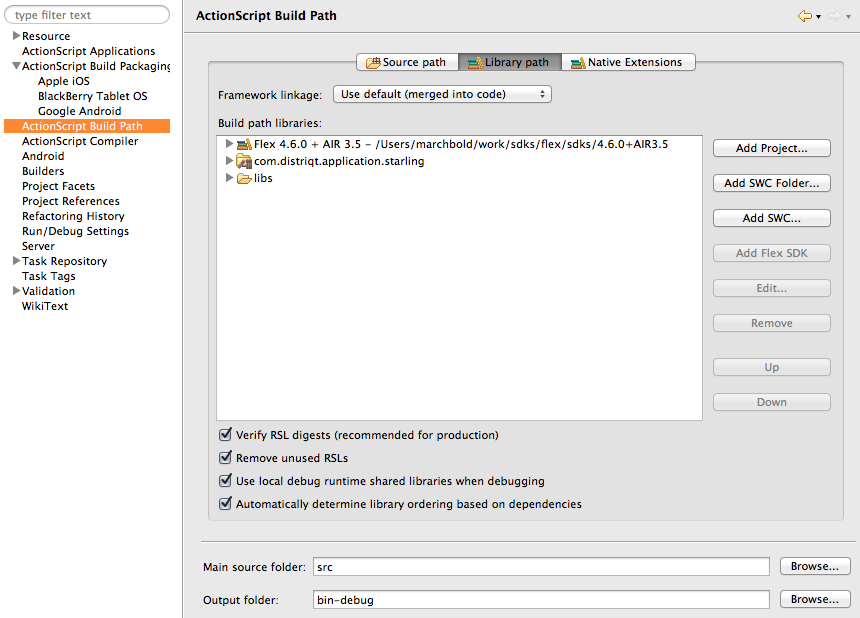
Browse to the SWC file and select Open. The ANE file should now appear in the screen above. You need to now expand the SWC entry and double click the Link Type to open the Library Path Options dialog, as below:


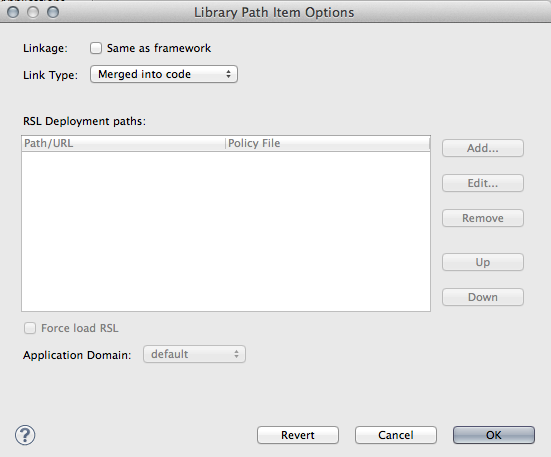
Change the Link Type to be External instead of the default Merged into code.

You should now be able to compile your project, using Project > Build Project.


Note: You won’t be able to run this application through the debugger as it won’t correctly package the extension through Flash builder.
Note: The part about changing the ANE file’s file extension from .ane to .swc is not strictly necessary. When you browse to find the file, in the “Choose a SWC file” dialog box, you can change the setting of the Files Of Type drop-down field. It is set by default to *.swc. Change it to *.*. This will have the same effect.
Packaging

You’ll need to manually add the extension ID to the application descriptor at this stage. See the Advanced details section on how to do this.

Now you’ll need to open up a command line in the directory of your built application. The directory should contain:

  • application swf: myApp.swf
  • application descriptor: myApp-app.xml
  • any required files such as icons, Default.png
  • the ANE(s) (in a subdirectory we’ll assume extensionsDir in the following)

The details on this command is dependent on the application you are developing and the platform you are targeting. You should review the documentation at the following url to determine the details of what the command should contain for your environment. http://help.adobe.com/en_US/air/build/WS597e5dadb9cc1e0253f7d2fc1311b491071-8000.html

For example the following command will create an APK for Android:

adt -package
	-target apk
	-storetype pkcs12 -keystore YOUR_SIGNING_KEY.p12
	myApp.apk
	myApp-app.xml
	myApp.swf icons
	-extdir extensionsDir
									

Flash Professional CS6

In CS6 Adobe have added the ability to simply add an ANE to your AIR project. In your AIR project FLA file, open your applications publish settings, by going to File > Publish Settings.


Select the wrench icon next to the Script dropdown. This will bring up the ActionScript Settings dialog.


Select the Library path tab and click Browse to a Native Extension (ANE) file, as shown above, and select the ANE file. You should now be able to use the extensions functionality in your project and CS6 will include the ANE code when you publish your application.

Flash Professional CS5.5

The procedure for CS5.5 is very similar to Flash Builder 4.5. The only difference is in the procedure to include the renamed ANE and set the linkage to external.

To add the extension:

  • Change the filename extension of the ANE file from .ane to .swc. This step is necessary so that Flash Professional can find the file
  • Select File > ActionScript Settings on your FLA file
  • Select the Library Path tab in the Advanced ActionScript 3.0 Settings dialog box
  • Select the Browse To SWC File button
  • Browse to the SWC file and select Open. The SWC file now appears in the Library Path tab in the Advanced ActionScript 3.0 Settings dialog box
  • With the SWC file selected, select the button Select Linkage Options For A Library (this looks like a small i in a circle above the panel).
  • In the Library Path Item Options dialog box, change the Link Type to External.

You should now be able to follow the instructions in the section Flash Builder 4.5 to package the application into an installable application including the ANE.

Advanced Details


Application Descriptor


To enable the extension in your application you need to add some additional information to your application descriptor. Basically this informs the compiler of what extensions are required in your application. Most of the IDE’s will add this automatically but it’s useful to understand what’s changing when you add an extension into your application.

The following shows two extensions added to an application. This node is generally located as the last node in the application descriptor.

<extensions>
    <extensionID>com.distriqt.Adverts</extensionID>
    <extensionID>com.distriqt.TestFlightSDK</extensionID>
</extensions>					

More details on the extensions ID can be found here.

An extension may also require additional permissions or definitions in the application descriptor. For example, requesting permission to access the vibration function with a vibrate extension. You should carefully consult the extensions documentation and add any required additions to the application descriptor. Incorrectly updating the descriptor may mean the extension cannot correctly operate.

iOS SDK

If you aren’t developing for iOS you can skip this step.

In the particular case of developing for iOS it is quite often a requirement that you have access to the iOS SDK to access the most recent features of the SDK.


Acquire the SDK // Official Method


You will need your Apple user ID, this is the same login you use when you access the iOS developer portal but you can sign up for a free one such as the one you use to access iTunes. The SDK is obtained through Apple’s XCode so we need to download and install that.

Note: You’ll need an OSX machine to do this, but you can quite easily do this on windows by installing an OSX virtual machine. You’ll need this machine to get updates to the SDK but once you’ve acquired the SDK you can use it on a windows machine.
  • Go to https://developer.apple.com/devcenter/ios/index.action
  • Enter your Apple login ID information and login
  • Once you are logged in, find the “Downloads” link to “Download the latest build of iOS SDK”, it is bundled with Xcode and will be labeled something like “Xcode 4.6.1?, the combined download size of the iPhone SDK and Xcode is quite large, several gigabytes so be prepared for a wait.
  • Once Xcode is downloaded, launch the installer and follow the instructions.

You will now have the latest version of the SDK installed on your machine. You’ll need to locate the directory, earlier version of Xcode will place the SDK here:

/Developer/Platforms/iPhoneOS.platform/Developer/SDKs/iPhoneOS5.0.sdk

However more recent versions will place it here:

/Applications/Xcode.app/Contents/Developer/Platforms/iPhoneOS.platform/Developer/SDKs/iPhoneOS6.1.sdk


Acquire the SDK // Unofficial Method


Just download the compressed SDK from our site:

  • resources.airnativeextensions.com/ios


Add to your Project


Adding the SDK to your project again depends on your development tool so we’ll go through each individually below.

Note: If you’re on windows you’ll need to copy the SDK directory completely to your windows machine and use that path in the following.

Flash Builder 4.6 / 4.7

Under Flash Builder 4.6/4.7 you simply go to your project settings and select the Apple iOS section in the Build Packaging. You’ll see a place down the bottom to enter in or browse for the path to the iOS SDK.


Flash Professional CS6

In Flash CS6 you can simply go into

File / AIR 3.x for iOS Settings...

Check the box next to iOS SDK and enter in the path to the SDK.


Flash Professional CS5.5 / Flash Builder 4.5

These remaining environments require usage of the adt command line to include the SDK. In particular we’re going to be using the platformsdk option of adt.

You should already have created a script or at least have a command to run on the command line from the previous sections. If you haven’t consult the section on Flash Builder 4.5 for a detailed guide. Windows developers using other environments should also do this.

In order to add the iOS SDK all we need to do is add in the platformsdk option with the full path to the SDK. For example:

adt -package
	-target ipa-test
	-provisioning-profile /path_to_provisioning_profile/Provisioning_Profile.mobileprovision
	-storetype pkcs12
	-keystore /path_to_certificate/certificate.p12
	-storepass xxxxx
	myApp.ipa
	application_xml_file.xml
	application_swf.swf
	-platformsdk /Applications/Xcode.app/Contents/Developer/Platforms/iPhoneOS.platform/Developer/SDKs/iPhoneOS6.1.sdk
									
Note: you’ll need a more recent version of AIR to use this platformsdk option. Version prior to 3.2 do not have this ability and you won’t be able to include the iOS SDK.

Windows

These remaining environments require usage of the adt command line to include the SDK. In particular we’re going to be using the platformsdk option of adt.

You should already have created a script or at least have a command to run on the command line from the previous sections. If you haven’t consult the section on Flash Builder 4.5 for a detailed guide. Windows developers using other environments should also do this.

In order to add the iOS SDK all we need to do is add in the platformsdk option with the full path to the SDK. For example:

adt -package
	-target ipa-test
	-provisioning-profile /path_to_provisioning_profile/Provisioning_Profile.mobileprovision
	-storetype pkcs12
	-keystore /path_to_certificate/certificate.p12
	-storepass xxxxx
	myApp.ipa
	application_xml_file.xml
	application_swf.swf
	-platformsdk /Applications/Xcode.app/Contents/Developer/Platforms/iPhoneOS.platform/Developer/SDKs/iPhoneOS6.1.sdk
									
Note: you’ll need a more recent version of AIR to use this platformsdk option. Version prior to 3.2 do not have this ability and you won’t be able to include the iOS SDK.

Start coding

You should now be set to go. Consult the documentation for the extension and start using native functionality!

Further Information

For more information:

  • Adobe documentation on using an extension: http://help.adobe.com/en_US/air/build/WS597e5dadb9cc1e0253f7d2fc1311b491071-8000.html
  • Refer to the documentation and support for the particular extension.
  • Subscribers can log an issue in GitHub and we'll answer your questions
  • Ask the community for support on Stackoverflow

airnativeextensions.com copyright © 2017

distriqt

terms & conditions privacy license